React.js
ReactJS Components | Type, Nesting, and Lifecycle for beginners

Table of Contents
- What is React Component?
- The types of React components
- What is the Nesting Components in ReactJS
- Components Lifecycle in ReactJS
What is React Component?
A React Component is like a building block for making things in a React app. You can think of it as a small part of what users see and interact with on the screen. Each component does its own job and can be reused in different places. It’s like having Lego pieces that you can use over and over again to build different things.
Important aspects of components
Reusability: Components can be reused in different parts of your application, making it easier to manage and maintain your code.
Encapsulation: Each component is like a little bubble that contains its own logic and styling, keeping things organized and preventing conflicts with other parts of the application.
Composition: Components can be combined or nested within each other to create more complex user interfaces, allowing you to build up your app from smaller, modular pieces.
Lifecycle: Components have a lifecycle with various stages like creation, updating, and destruction. This allows you to hook into different points in a component’s life and perform actions or updates as needed.
State and Props: Components can have their own internal state (data) and receive external data through props (properties). This allows components to be dynamic and interactive, responding to user input or changes in data.
Performance Optimization: Components can be optimized for performance by using techniques like memoization, shouldComponentUpdate, or PureComponent to minimize unnecessary renders and improve the overall speed of your application.
The types of React components
There are two types of React components, Functional Components and Class Components.
Functional Components
These are simple functions that return JSX, which is essentially the UI elements.
They don’t have their own internal state.
They receive data as props and return what should be rendered.
They are easier to read and write.
Example:
// Functional Component
function Welcome(props) {
    return <h1>Hello, {props.name}</h1>;
}

// Usage
ReactDOM.render(
    <Welcome name="CodeSick" />,
    document.getElementById('root')
);
Class Components
These are JavaScript classes that extend React.Component.
They have their own state, which allows them to manage data and respond to user input.
They have lifecycle methods like ‘componentDidMount’, ‘componentDidUpdate’, etc., which allow for more control over how the component behaves.
Example:
// Class Component
class Welcome extends React.Component {
    render() {
        return <h1>Hello, {this.props.name}</h1>;
    }
}

// Usage
ReactDOM.render(
    <Welcome name="CodeSick" />,
    document.getElementById('root')
);
Both types of components accomplish the same task of rendering UI elements, but they differ in how they are defined and how they manage data and behavior. Functional components are simpler and usually sufficient for basic UI rendering, while class components offer more features and control for complex UIs with state management and lifecycle events.
What is the Nesting Components in ReactJS
Nesting components in React is like putting one thing inside another. Imagine building a house: you have bricks, windows, and doors. You put the bricks together to make walls, and then you put the windows and doors into the walls to build the house.
Similarly, in React, you can have smaller components, like buttons or text inputs, and you can put them inside bigger components, like a header or a sidebar. This helps you organize your code and build more complex things by combining simpler parts.
// Logo component
function Logo() {
    return <img src="logo.png" alt="Logo" />;
}

// Navigation component
function Navigation() {
    return (
        <nav>
            <ul>
                <li><a href="/">Home</a></li>
                <li><a href="/about">About</a></li>
                <li><a href="/contact">Contact</a></li>
            </ul>
        </nav>
    );
}

// Header component
function Header() {
    return (
        <header>
            <Logo />
            <Navigation />
        </header>
    );
}

// Usage
ReactDOM.render(
    <Header />,
    document.getElementById('root')
);
In this example, the ‘Header’ component nests the ‘Logo’ and ‘Navigation’ components within it. When ‘Header’ is rendered, it will also render the ‘Logo’ and ‘Navigation’ components inside it.
Nesting components helps in creating a modular and maintainable codebase, as each component can focus on a specific part of the UI. It also promotes reusability, as components can be reused in different parts of the application.
Components Lifecycle in ReactJS
In React, think of a component’s lifecycle like the different stages of a plant’s growth. Here’s a simplified explanation,
Planting (Mounting)
- Planting Seeds (constructor): This is where you prepare things, like setting up a garden bed. You do initial setup, like setting initial state or binding functions.
- Growing (render): This is where your plant starts to grow and take shape. You create the visual parts of your component here.
- Blooming (componentDidMount): Once your plant is fully grown, it blooms. This is where you do extra stuff, like watering it or adding decorations. Similarly, in React, you might fetch data or set up timers here.
Growing Further (Updating)
- Checking for Growth ( shouldComponentUpdate() ): Before your plant grows more, you might check if it needs to grow. Similarly, in React, you might check if your component needs to update based on new information.
- Growing More ( render() ): If your plant needs to grow more, it does so here. Similarly, in React, you update the visual parts of your component.
- Adjusting to Changes ( componentDidUpdate() ): After your plant grows more, you might adjust it based on its new size. Similarly, in React, you might do extra stuff after an update, like updating the state or interacting with the DOM.
End of Life (Unmounting)
- Harvesting (componentWillUnmount): When your plant is done growing and you want to remove it, you harvest it. Similarly, in React, you clean up anything your component might have used, like event listeners or timers, before it’s removed from the screen.
These stages help you manage your components behavior over time, ensuring they grow and change smoothly without causing issues.


Table of Contents
- What Is TypeScript?
- The advantages of using TypeScript with React
- Install and set up TypeScript with React
- Some examples of TypeScript usage in React components
- Working with React Hooks and TypeScript
As a web developer, I’ve noticed a popular trend in software development: people are combining TypeScript with React. TypeScript is like a supercharged version of JavaScript that helps make code better and tools easier to use. And React is a common library for making web interfaces.
When you put TypeScript and React together, the code you write tends to be cleaner, work better, and have fewer mistakes. With TypeScript, you can catch errors early, which saves time. It also makes the code easier to understand and maintain, especially for big projects.
I’ve found that many tools and frameworks, like Create React App, make it easy to use TypeScript with React. And one of the things I like most about it is that you can specify the types of data your components need, which helps prevent mistakes.
Overall, TypeScript and React work really well together and can make building and managing complex projects a lot easier.
What Is TypeScript?
TypeScript is a programming language developed by Microsoft. It’s often described as a superset of JavaScript, which means it builds on top of JavaScript by adding new features and capabilities.
One of the main features of TypeScript is static typing. This means that you can specify the type of data that variables can hold, which helps catch errors early in the development process and makes code more predictable and easier to understand.
TypeScript also supports many modern JavaScript features and provides additional tools for organizing and managing code, such as classes, modules, and interfaces.
TypeScript is a powerful tool for building large-scale applications in JavaScript, offering improved code quality, better tooling support, and increased developer productivity.
The advantages of using TypeScript with React
Type Safety: TypeScript helps catch mistakes early by making sure data is used in the right way.
Improved Code Quality: TypeScript makes code cleaner and stronger, reducing the chances of errors.
Enhanced Developer Experience: TypeScript helps developers work faster and with fewer mistakes by providing helpful suggestions and spotting errors as they write code.
Scalability: TypeScript is great for big projects because it keeps everything organized and easy to understand as the project grows.
Better Collaboration: TypeScript makes it easier for developers to understand each other’s code, which helps teams work together smoothly.
Tooling Support: Many tools for React work well with TypeScript, making it easy to set up and use.
Ecosystem Compatibility: TypeScript works well with other popular libraries and tools used in React projects, ensuring everything plays nicely together.
Install and set up TypeScript with React
- Install Node.js and npm: If you haven’t already, download and install Node.js from the official website. This will also install npm, which is Node.js’ package manager.
- Create a React App: Open your terminal or command prompt and run the following command to create a new React app using Create React App:
npx create-react-app my-appReplace my-app with the name of your project.
- Navigate to Your Project: Move into your project directory by running:
cd my-appReplace my-app with the name of your project directory.
- Install TypeScript: Inside your project directory, install TypeScript as a development dependency by running:
npm install --save-dev typescript @types/node @types/react @types/react-dom @types/jest- Rename Files: Rename the files
src/index.jsandsrc/App.jstosrc/index.tsxandsrc/App.tsx, respectively. This will convert them to TypeScript files. - Update tsconfig.json: Create a
tsconfig.jsonfile in the root of your project directory if it doesn’t already exist. Add the following content to it:
   {
     "compilerOptions": {
       "target": "es5",
       "lib": ["dom", "dom.iterable", "esnext"],
       "allowJs": true,
       "skipLibCheck": true,
       "esModuleInterop": true,
       "allowSyntheticDefaultImports": true,
       "strict": true,
       "forceConsistentCasingInFileNames": true,
       "module": "esnext",
       "moduleResolution": "node",
       "resolveJsonModule": true,
       "isolatedModules": true,
       "noEmit": true,
       "jsx": "react"
     },
     "include": ["src"]
}- Start the Development Server: Finally, start the development server by running:
npm startThis will launch your React app with TypeScript enabled. You can now start writing React components using TypeScript!
That’s it! Now You’ve successfully installed and configured TypeScript with React in your project.
Some examples of TypeScript usage in React components
Sure! Here are the examples with your website name, codesick.net:
- Functional Component with Props:
import React from 'react';

interface GreetingProps {
  name: string;
}

const Greeting: React.FC<GreetingProps> = ({ name }) => {
  return <div>Hello, {name}! Welcome to codesick.net</div>;
};

export default Greeting;- Class Component with State:
import React, { Component } from 'react';

interface CounterState {
  count: number;
}

class Counter extends Component<{}, CounterState> {
  constructor(props: {}) {
    super(props);
    this.state = {
      count: 0
    };
  }

  increment = () => {
    this.setState({ count: this.state.count + 1 });
  };

  render() {
    return (
      <div>
        <p>Count: {this.state.count}</p>
        <button onClick={this.increment}>Increment</button>
        <p>Welcome to codesick.net</p>
      </div>
    );
  }
}

export default Counter;- Using React Hooks:
import React, { useState } from 'react';

const NameInput: React.FC = () => {
  const [name, setName] = useState<string>('');

  const handleChange = (event: React.ChangeEvent<HTMLInputElement>) => {
    setName(event.target.value);
  };

  return (
    <div>
      <input type="text" value={name} onChange={handleChange} />
      <p>Hello, {name || 'stranger'}! Welcome to codesick.net</p>
    </div>
  );
};

export default NameInput;
Working with React Hooks and TypeScript
Working with React Hooks and TypeScript allows for more concise and type-safe code. Here are examples,
useState
import React, { useState } from 'react';

const Counter: React.FC = () => {
  const [count, setCount] = useState<number>(0);

  return (
    <div>
      <p>Count: {count}</p>
      <button onClick={() => setCount(count + 1)}>Increment</button>
    </div>
  );
};

export default Counter;
useEffect
import React, { useEffect, useState } from 'react';

const DocumentTitleUpdater: React.FC = () => {
  const [count, setCount] = useState<number>(0);

  useEffect(() => {
    document.title = `Count: ${count}`;
  }, [count]);

  return (
    <div>
      <p>Count: {count}</p>
      <button onClick={() => setCount(count + 1)}>Increment</button>
    </div>
  );
};

export default DocumentTitleUpdater;
useContext
import React, { useContext, useState } from 'react';

interface ThemeContextType {
  theme: string;
  setTheme: React.Dispatch<React.SetStateAction<string>>;
}

const ThemeContext = React.createContext<ThemeContextType | undefined>(undefined);

const ThemeButton: React.FC = () => {
  const { theme, setTheme } = useContext(ThemeContext)!;

  return (
    <button onClick={() => setTheme(theme === 'light' ? 'dark' : 'light')}>
      Toggle Theme
    </button>
  );
};

export { ThemeContext, ThemeButton };
useRef
import React, { useRef } from 'react';

const InputFocus: React.FC = () => {
  const inputRef = useRef<HTMLInputElement>(null);

  const handleClick = () => {
    inputRef.current?.focus();
  };

  return (
    <div>
      <input type="text" ref={inputRef} />
      <button onClick={handleClick}>Focus Input</button>
    </div>
  );
};

export default InputFocus;
useReducer
import React, { useReducer } from 'react';

type CounterAction = { type: 'increment' } | { type: 'decrement' };
const counterReducer = (state: number, action: CounterAction): number => {
  switch (action.type) {
    case 'increment':
      return state + 1;
    case 'decrement':
      return state - 1;
    default:
      return state;
  }
};

const CounterWithReducer: React.FC = () => {
  const [state, dispatch] = useReducer(counterReducer, 0);

  return (
    <div>
      <p>Count: {state}</p>
      <button onClick={() => dispatch({ type: 'increment' })}>Increment</button>
      <button onClick={() => dispatch({ type: 'decrement' })}>Decrement</button>
    </div>
  );
};

export default CounterWithReducer;
Table of Contents
- What is Express js?
- What are the main features of Express js?
- what are the Benefits of Using Express js With React js
- How to use Express js with React
What is Express js?
Imagine you’re hosting a big dinner party. You need a way to manage all the guests, handle their requests, and make sure everything runs smoothly. Express.js is like the master organizer for your party, it’s a framework for building web applications and APIs using JavaScript.
Here’s how it works: Express.js provides you with tools and structures to create routes, which are like paths for requests to travel along. These routes handle different kinds of requests, like someone asking for a webpage or submitting a form.
Think of it this way: if someone at your party asks for a specific dish, you have a route (or pathway) to the kitchen to get it. Express.js helps you set up these routes efficiently.
It also helps you manage incoming data. Just like you’d want to know if a guest has any allergies or preferences, Express.js helps you process and understand the data that comes with each request.
Plus, Express.js lets you plug in additional tools and middleware, which are like helpers that do specific tasks. For instance, you might want a security guard (middleware) to check IDs at the door (route) before letting guests in.
In summary, Express.js is like the ultimate event planner for your web applications, helping you handle requests, manage data, and keep everything organized and running smoothly, just like a great party host!
What are the main features of Express js?

- Routing: Express.js provides a straightforward and flexible routing system that allows developers to define routes based on HTTP methods (GET, POST, PUT, DELETE, etc.) and URL patterns. This makes it easy to handle different types of requests and direct them to the appropriate handlers.
- Middleware: Middleware functions in Express.js are key to its flexibility and extensibility. These functions can intercept and process incoming requests, perform tasks such as parsing request bodies, handling authentication, logging, and error handling. They can be chained together to create a pipeline, allowing for modular and reusable code.
- Template Engines: Express.js supports various template engines, making it easy to generate dynamic HTML content based on data from the server. This feature simplifies server-side rendering and allows for the creation of dynamic web pages.
- Error Handling: Express.js provides built-in error handling mechanisms, allowing developers to define error-handling middleware to catch and process errors that occur during request processing. This helps improve the robustness and reliability of applications.
- Static File Serving: Express.js can serve static files (such as HTML, CSS, JavaScript, images, etc.) from a specified directory, simplifying the process of serving client-side assets and building web applications with frontend frameworks.
These main features, combined with Express.js’s minimalist design and performance, make it a popular choice for building web applications and APIs.
what are the Benefits of Using Express js With React js
- Seamless Integration: Express.js and React.js work well together, allowing developers to seamlessly integrate frontend and backend components into a single application. This integration enables smoother communication between the client-side and server-side parts of the application.
- Efficient Development: With Express.js handling the backend logic and API endpoints, and React.js managing the frontend user interface, developers can focus on their respective areas of expertise. This separation of concerns makes development more efficient and organized.
- Scalability: Express.js is known for its scalability, making it suitable for building robust backend APIs that can handle a large number of requests. When combined with React.js on the frontend, developers can create scalable applications capable of serving many users simultaneously.
- Performance: React.js’s virtual DOM and client-side rendering capabilities help create fast and responsive user interfaces. When paired with Express.js, which is known for its performance and low overhead, developers can deliver high-performance web applications that provide a smooth user experience.
- Community and Ecosystem: Both Express.js and React.js have large and active communities with a wealth of resources, libraries, and plugins available. Leveraging these ecosystems allows developers to speed up development, find solutions to common problems, and stay up-to-date with best practices.
- SEO-Friendly: While React.js applications are traditionally single-page applications (SPAs) that rely heavily on client-side rendering, using Express.js with React.js allows for server-side rendering (SSR). SSR can improve search engine optimization (SEO) by ensuring that content is rendered on the server and sent to the client, making it more accessible to search engine crawlers.
How to use Express js with React
Backend (Express.js)
- First, make sure you have Node.js installed on your system.
- Initialize a new Node.js project and install Express.js:
mkdir codesick
cd codesick
npm init -y
npm install express- Create an
index.jsfile for your Express.js server:
// index.js
const express = require('express');
const app = express();
const PORT = 5000;

// Define a simple route
app.get('/', (req, res) => {
  res.send('Hello from CodeSick!');
});

// Start the server
app.listen(PORT, () => {
  console.log(`Server is running on http://localhost:${PORT}`);
});- Run the server:
node index.jsNow, you have a basic Express.js server running on http://localhost:5000.
Frontend (React.js)
- Initialize a new React.js project using Create React App:
npx create-react-app codesick-client
cd codesick-client- Create a simple React component to display a message:
// src/App.js
import React, { useState, useEffect } from 'react';

function App() {
  const [message, setMessage] = useState('');

  useEffect(() => {
    fetch('/api/message')
      .then(response => response.text())
      .then(data => setMessage(data))
      .catch(error => console.error('Error fetching message:', error));
  }, []);

  return (
    <div>
      <h1>Hello from CodeSick!</h1>
      <p>Message from CodeSick Backend: {message}</p>
    </div>
  );
}

export default App;- Modify
src/index.jsto render theAppcomponent:
// src/index.js
import React from 'react';
import ReactDOM from 'react-dom';
import App from './App';

ReactDOM.render(<App />, document.getElementById('root'));- Start the React development server:
npm startNow, you have a React.js frontend running on http://localhost:3000.
Integrating Frontend with Backend
To integrate the frontend with the backend, you can make a request from the React.js frontend to the Express.js backend.
For example, you can modify src/App.js in the React.js project to fetch data from the Express.js server:
// src/App.js
import React, { useState, useEffect } from 'react';

function App() {
  const [message, setMessage] = useState('');

  useEffect(() => {
    fetch('/api/message')
      .then(response => response.text())
      .then(data => setMessage(data))
      .catch(error => console.error('Error fetching message:', error));
  }, []);

  return (
    <div>
      <h1>Hello from CodeSick!</h1>
      <p>Message from CodeSick Backend: {message}</p>
    </div>
  );
}

export default App;
Then, you can modify the Express.js server to handle this request:
// index.js
const express = require('express');
const app = express();
const PORT = 5000;

// Define a simple route
app.get('/', (req, res) => {
  res.send('Hello from CodeSick!');
});

// Route to send message to frontend
app.get('/api/message', (req, res) => {
  res.send('Message from CodeSick Backend!');
});

// Start the server
app.listen(PORT, () => {
  console.log(`Server is running on http://localhost:${PORT}`);
});
Now, when you visit http://localhost:3000 in your browser, you should see the React.js frontend displaying the message from the Express.js backend,
“Hello from CodeSick! Message from CodeSick Backend: Message from CodeSick Backend!”

Table of Contents
- What is Redux?
- Why Redux?
- Principles of Redux
- Pros and Cons of Redux
- Simple counter application with Redux
What is Redux?
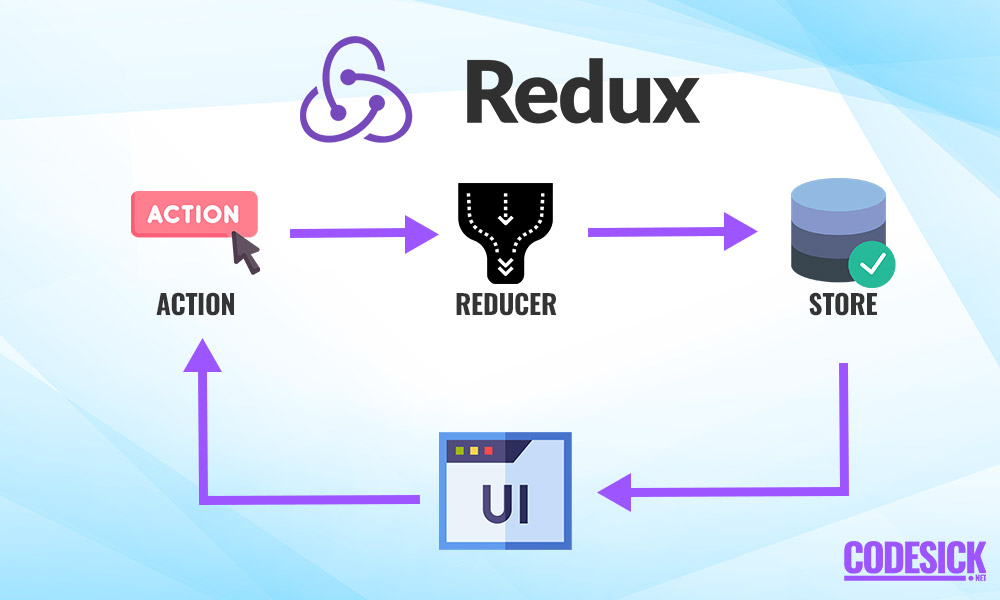
Imagine you have a big box where you keep all the important information about your app, like the current user, their preferences, and what’s happening in the app at any given moment. This big box is your application’s state.
Now, sometimes different parts of your app need to know what’s in this big box or change something inside it. But you don’t want things to get messy with parts of your app randomly changing stuff in the big box without everyone knowing about it.
Redux is like a manager for this big box. It helps you keep track of what’s inside it and makes sure that any changes are done properly. Instead of each part of your app directly changing things in the big box, they ask the manager (Redux) to make changes for them.
So, Redux gives you a set of rules to follow. When something needs to change in the big box (like updating the current user or adding a new message), you first tell Redux about it. Redux then makes sure the change happens correctly and notifies all the parts of your app that care about it.
In simple terms, Redux helps you manage and control the important information in your app, making it easier to keep everything organized and working smoothly.
Why Redux?
In React, passing data between components can be messy, especially with lots of states to manage. Redux simplifies this by storing all the states in a central place called a “store.” This way, components can easily access the needed data from the store, making state management much simpler and organized.
Principles of Redux
- Single Source of Truth: Redux promotes having a single, centralized store to contain the entire application state. This makes it easier to manage and update data consistently across the app.
- State is Read-Only: In Redux, state is immutable, meaning it cannot be directly modified. Instead, changes are made by dispatching actions, which describe what happened in the application.
- Changes are Made with Pure Functions: Redux reducers are pure functions that take the current state and an action, and return a new state. This ensures predictability and maintainability of state changes.
- Unidirectional Data Flow: Data in Redux flows in one direction: from the store to the components. Actions are dispatched to modify the state, and changes are reflected in the components subscribed to the store.
- Changes are Recorded: Redux keeps a record of all actions dispatched in the application’s history. This enables powerful debugging tools like time-travel debugging, allowing developers to replay actions and see how state evolves over time.
By adhering to these principles, Redux provides a structured and predictable way to manage application state, making it easier to develop and maintain complex applications.
Pros and Cons of Redux
| Pros | Cons |
|---|---|
| Centralized State Management: In Redux, all your application’s data is neatly organized in one place, making it easy to keep track of everything. | Boilerplate Code: Setting up Redux can feel a bit like paperwork sometimes. You might end up writing more code than you would with simpler state management solutions. |
| Predictable State Changes: Redux follows strict rules about how data can change, which means you’ll always know what’s happening to your data and why. | Learning Curve: Learning Redux can be a bit challenging, especially if you’re new to concepts like reducers and immutable data. It might take a bit of time to get the hang of it. |
| Time-Travel Debugging: With Redux, you get some pretty cool debugging tools that let you “time-travel” through your app’s state changes. This can be a lifesaver when you’re trying to track down bugs. | Over-Engineering: Sometimes Redux can feel like overkill, especially for smaller apps or simpler use cases. You might end up adding more complexity than you really need. |
| Scalability: Redux is great for big, complex applications because it helps you keep everything organized as your app grows. | Performance Overhead: Because Redux is so strict about how data can change, it can sometimes be slower than other state management solutions. If you’re not careful, this could lead to performance issues. |
| Community and Ecosystem: There’s a huge community of developers using Redux, which means there are plenty of tutorials, libraries, and other resources available to help you out. | Potential Anti-Patterns: If you’re not careful, it’s easy to misuse Redux and end up with code that’s hard to maintain. You might accidentally create things like unnecessary nesting of state or global state when you don’t need to. |
Simple counter application with Redux
store.js
import { createStore } from 'redux';

// Reducer function
const counterReducer = (state = { count: 0 }, action) => {
  switch (action.type) {
    case 'INCREMENT':
      return { count: state.count + 1 };
    case 'DECREMENT':
      return { count: state.count - 1 };
    default:
      return state;
  }
};

// Create Redux store
const store = createStore(counterReducer);

export default store;
Counter.js
import React from 'react';
import { useSelector, useDispatch } from 'react-redux';

function Counter() {
  const count = useSelector(state => state.count);
  const dispatch = useDispatch();

  const increment = () => {
    dispatch({ type: 'INCREMENT' });
  };

  const decrement = () => {
    dispatch({ type: 'DECREMENT' });
  };

  return (
    <div>
      <h2>Counter: {count}</h2>
      <button onClick={increment}>Increment</button>
      <button onClick={decrement}>Decrement</button>
    </div>
  );
}

export default Counter;
index.js
import React from 'react';
import ReactDOM from 'react-dom';
import { Provider } from 'react-redux';
import store from './store';
import Counter from './Counter';

ReactDOM.render(
  <Provider store={store}>
    <Counter />
  </Provider>,
  document.getElementById('root')
);


-
 Python2 months ago
Getting Started with Python | A Beginner’s Guide
-
React.js2 months ago
Start Your React Journey | A Step-by-Step Guide.
-
React.js2 months ago
How to Use Props in React for beginners
-
React.js2 months ago
React with Express JS | Understanding the Basics
-
React.js2 months ago
ReactJS State | SetState, Props and State Explained for beginners
-
React.js2 months ago
React With Redux | Understanding the Basics
-
Flutter1 month ago
Introduction to Flutter | Flutter tutorial for beginners
-
Python1 month ago
Setting Up Python on Your Desktop in 2 Simple Steps | Python Programming